20 Icebox Cake Recipes You Can Make Ahead
fromcookscrafter.comcookscrafter.com/20-make-ahead-icebox-cake-recipes
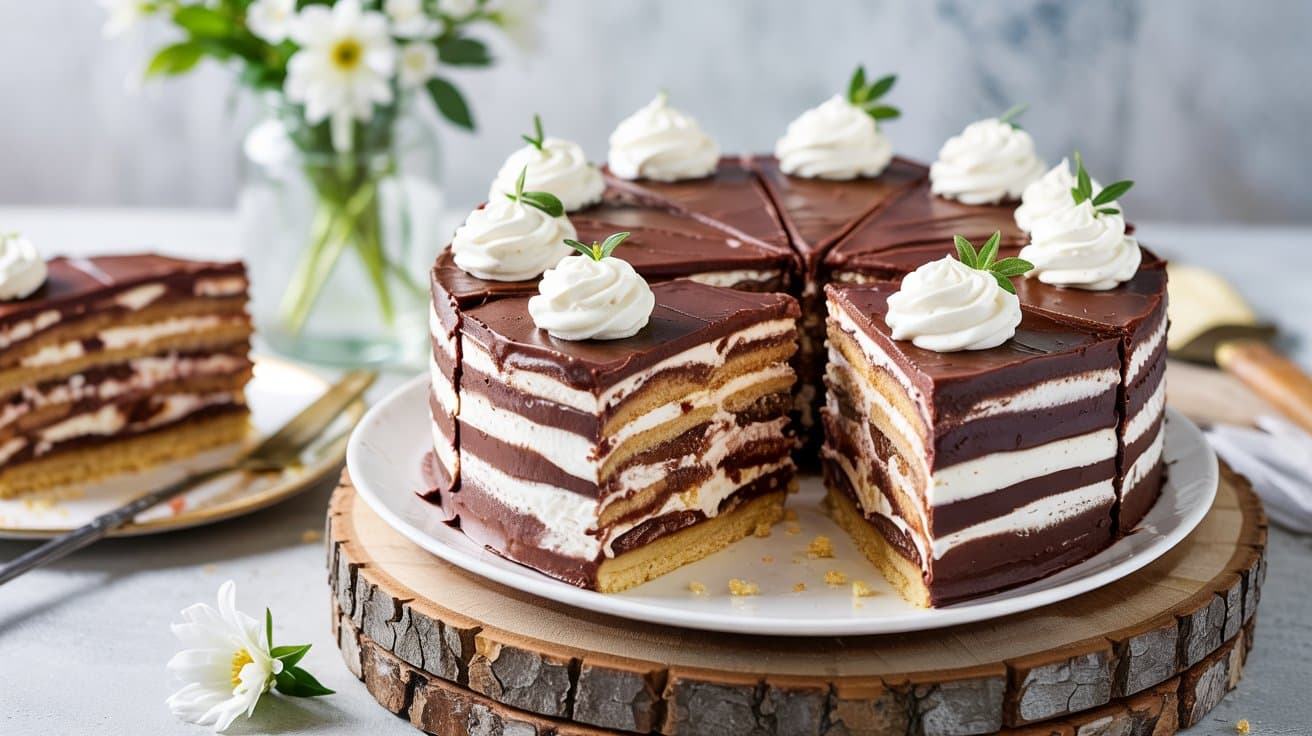
Icebox cakes layer whipped cream, chocolate, and graham crackers. Swap chocolate for berries. Make ahead, chill 4-6 hours for creamy, cool desserts.
Ingredients
Instructions
In a large mixing bowl, beat the heavy cream with an electric mixer until soft peaks form. Gradually add the sugar and vanilla extract, then continue beating until stiff peaks are formed.
On a serving dish or in a deep rectangular pan, spread a thin layer of whipped cream to anchor the first layer of chocolate wafers. Arrange wafers in a single, flat layer, breaking them gently as needed to fit.
Spread about one-third of the whipped cream evenly over the wafer layer. Repeat this layering process two more times, finishing with a layer of whipped cream on top.
Cover the assembled cake with plastic wrap and refrigerate for at least 8 hours or overnight to let the wafers soften and the flavors meld.
Before serving, optionally dust the top with cocoa powder or garnish with chocolate shavings for a touch of extra elegance. Slice carefully and serve chilled.
Convenience - No oven needed; assemble in minutes and chill until ready.
Flavor balance - Sweet vanilla wafers paired with juicy strawberries and lightly sweetened whipped cream.
Texture - Crisp wafers soften overnight, creating tender and smooth layers contrasted by fresh fruit.
Family-friendly - Simple ingredients and a familiar flavor everyone can enjoy.
Use gluten-free vanilla wafers - Replace regular wafers with gluten-free ones for dietary restrictions.
Swap heavy cream for coconut cream - Make it dairy-free by whipping coconut cream instead of dairy heavy cream.
Try other fresh berries - Blueberries, raspberries, or blackberries work well if strawberries aren't available.
Use flavored wafers - Vanilla wafers can be swapped for lemon or almond-flavored cookies for a different twist.
3 cups fresh strawberries - hulled and sliced for layering.
24 vanilla wafers - store-bought or homemade, crisp for layering.
2 cups heavy whipping cream - chilled for whipping.
¼ cup granulated sugar - to sweeten the whipped cream.
1 teaspoon pure vanilla extract - added to whipped cream for flavor.
Optional fresh mint sprigs - for garnish.
In a large bowl, whip the heavy cream with sugar and vanilla extract until soft peaks form, being careful not to overwhip.
Spread a thin layer of whipped cream on the bottom of a 9x9-inch dish or similar sized container.
Arrange a single layer of vanilla wafers evenly over the whipped cream.
Spoon half of the sliced strawberries over the wafer layer, then spread about one-third of the whipped cream over the fruit.
Repeat the layers with the remaining wafers, strawberries, and whipped cream, finishing with a final layer of whipped cream.
Cover and refrigerate for at least 4 hours or overnight, allowing the wafers to soften and the flavors to meld.
Just before serving, garnish with fresh mint sprigs if desired and add a few strawberry slices on top for presentation.
Convenience - Requires no baking, just assembly and chilling.
Flavor balance - Combines bold coffee, rich chocolate, and creamy mascarpone.
Texture - Soft, coffee-moistened cookies contrast with smooth cream layers.
Appeal - Attractive layered dessert that's ideal for entertaining or casual treats.
Mascarpone cheese - Use cream cheese blended with a little heavy cream for a slightly tangier version.
Chocolate cookies - Replace with gluten-free chocolate wafer cookies for a gluten-free dessert.
Coffee - Use decaf coffee or strong brewed espresso depending on your caffeine preference.
Sweetener - Substitute granulated sugar with honey or maple syrup in the cream for a natural sweetener option.
1 ½ cups strong brewed coffee cooled to room temperature.
24 chocolate wafer cookies store-bought or homemade.
1 cup mascarpone cheese softened to room temperature.
1 cup heavy cream cold, for whipping.
½ cup granulated sugar adjust sweetness to taste.
2 tablespoons unsweetened cocoa powder for dusting.
1 teaspoon vanilla extract for flavor.
Brew strong coffee and let it cool completely at room temperature. Pour into a shallow dish wide enough to dip cookies.
In a medium bowl, beat mascarpone, sugar, and vanilla extract until smooth. In a separate bowl, whip the cold heavy cream until stiff peaks form. Gently fold the whipped cream into the mascarpone mixture until well combined.
Quickly dip each cookie into the coffee, just enough to moisten without becoming soggy. Lay a single layer of dipped cookies in the bottom of a 9x9-inch dish. Spread half of the mascarpone cream evenly over the cookie layer.
Repeat with another layer of dipped cookies and spread the remaining cream on top. Smooth the surface with a spatula. Dust the top with cocoa powder using a fine sieve.
Cover and refrigerate for at least 4 hours or overnight to allow the cookies to soften and the flavors to meld. Slice into squares and serve chilled.
Convenience - Requires no baking and assembles quickly, perfect for busy cooks.
Flavor balance - Combines zesty lemon cream with sweet and juicy blueberries for a bright taste.
Texture - Layers of soft cream and softened crackers create a tender, cake-like feel.
Appeal - bright colors and simple presentation suit casual family gatherings or special occasions.
Cream cheese and whipped cream - Use coconut cream and vegan cream cheese to make a dairy-free version.
Graham crackers - Substitute with gluten-free crackers or ladyfingers for gluten-free diets.
Blueberries - Replace with raspberries, blackberries, or sliced strawberries for different berry flavors.
Lemon flavor - Add fresh lime zest or orange zest instead of lemon for a citrus twist.
2 cups heavy whipping cream - Chilled for whipping into the lemon cream.
8 ounces cream cheese - Softened to mix smoothly with the cream.
¾ cup powdered sugar - Adds sweetness to the cream mixture.
2 tablespoons lemon zest - Freshly grated for bright citrus flavor.
¼ cup freshly squeezed lemon juice - Provides tang and balances sweetness.
2 cups fresh blueberries - Washed and drained, to layer between the cream and crackers.
1 package graham crackers - Approx. 9 ounces, used for layering.
In a large bowl, beat the softened cream cheese with powdered sugar until smooth and creamy. Add lemon zest and lemon juice, mixing until combined.
In a separate chilled bowl, whip the heavy cream until stiff peaks form. Gently fold the whipped cream into the lemon cream mixture, keeping it light and fluffy.
Spread a thin layer of the lemon cream mixture on the bottom of a 9x9-inch glass dish. Place a single layer of graham crackers over the cream, breaking them as needed to fit.
Spread a layer of lemon cream over the crackers, then scatter a layer of fresh blueberries on top. Repeat layers-graham crackers, lemon cream, and blueberries-until ingredients are used, finishing with a layer of cream on top.
Cover the dish with plastic wrap and refrigerate for at least 6 hours or overnight. This allows the graham crackers to soften and the flavors to meld. Serve chilled, slicing into squares to enjoy.
Convenience - Requires no baking and minimal prep, saving time.
Flavor balance - Combines creamy peanut butter richness with bittersweet chocolate tones.
Texture - Alternates crisp chocolate wafers with smooth, airy peanut butter filling.
Appeal - Crowd-pleasing dessert perfect for family gatherings or casual dinners.
Peanut butter substitute - Use almond or cashew butter for a different nutty flavor.
Chocolate wafers - Replace with gluten-free chocolate cookies to accommodate gluten restrictions.
Cream cheese - Swap with vegan cream cheese for a dairy-free version.
Sweetener - Use maple syrup instead of powdered sugar to add a natural sweetness.
1 cup creamy peanut butter
8 ounces cream cheese, softened
1 cup powdered sugar
1 ½ cups heavy cream
1 teaspoon vanilla extract
40 chocolate wafer cookies (about 2 packages)
In a large bowl, beat the peanut butter and softened cream cheese together until smooth and fully combined.
Add the powdered sugar and vanilla extract and continue to mix until evenly incorporated.
In a separate bowl, whip the heavy cream until stiff peaks form. Gently fold the whipped cream into the peanut butter mixture until fully combined and fluffy.
In a 9x13 inch dish, arrange a single layer of chocolate wafers covering the bottom. Spread about one-third of the peanut butter cream evenly over the wafers. Repeat layering twice more, ending with a layer of cream on top.
Cover and refrigerate the cake for at least 6 hours or overnight. This allows the wafers to soften and the flavors to meld. Slice and serve chilled.
Convenience - Requires no baking and can be prepared ahead of time.
Flavor balance - Earthy matcha combined with sweet, creamy layers offers nuanced taste.
Texture - Crunchy vanilla wafers soften slightly, complementing the smooth cream.
Appeal - Elegant and modern presentation perfect for casual or special gatherings.
Matcha powder - Use powdered green tea or even a mild white tea powder for a subtler flavor.
Vanilla wafers - Substitute with gluten-free cookies or crispy ladyfingers for texture variation.
Heavy cream - Replace with coconut cream for a dairy-free version that still whips well.
Sweetener - Use honey or maple syrup instead of granulated sugar for a natural sweetness.
2 teaspoons matcha green tea powder - Provides the distinct earthy flavor and green color.
1 cup heavy cream - Whipped to create the light, creamy layer.
¼ cup granulated sugar - Sweetens the cream base evenly.
1 teaspoon vanilla extract - Adds warmth and depth to the cream.
24 vanilla wafers - Thin, crisp cookies that soften when chilled and layer the cake.
Optional garnish fresh berries or whipped cream - Adds freshness and decoration.
In a mixing bowl, sift the matcha powder to remove lumps. Add the sugar and mix gently.
Whip the heavy cream and vanilla extract until soft peaks form. Fold in the matcha and sugar mixture carefully until fully combined and smooth.
Spread a thin layer of the matcha cream on the bottom of a loaf pan or a rectangular dish. Arrange a single layer of vanilla wafers over the cream.
Repeat layering with cream and wafers until all ingredients are used, finishing with a layer of matcha cream on top.
Cover the dish and refrigerate for at least 4 hours or overnight. This chilling time allows the wafers to soften and flavors to meld.
Before serving, optionally garnish with fresh berries or a dollop of whipped cream. Slice and serve chilled.
Convenience - No baking required, simple assembly with just a few ingredients.
Flavor balance - Sweet caramel and salty pretzels create a satisfying contrast.
Texture - Crunchy pretzels paired with creamy layers offer enjoyable mouthfeel.
Make-ahead friendly - Needs refrigeration to set, making it easy to prepare in advance.
Pretzels - Use gluten-free pretzels to keep the crunchy texture if gluten is a concern.
Caramel sauce - Substitute with a dairy-free caramel or chocolate sauce for variety.
Whipped cream - Replace with coconut whipped cream for a dairy-free option.
Cookies - Use graham crackers or digestive biscuits instead of pretzels for a less salty version.
1 ½ cups pretzels - Crushed, for crunchy layers and salty flavor.
2 cups heavy whipping cream - Chilled, for creating fluffy whipped cream layers.
½ cup powdered sugar - To sweeten the whipped cream.
1 teaspoon vanilla extract - Adds a warm, aromatic note to the cream.
1 cup caramel sauce - Store-bought or homemade, for sweet layers.
¼ teaspoon flaky sea salt - For sprinkling on top to enhance flavor contrast.
In a large mixing bowl, beat the chilled heavy cream, powdered sugar, and vanilla extract together until stiff peaks form. Set this whipped cream aside.
Spread a thin layer of caramel sauce on the bottom of a 9x9 inch square baking dish or similar container.
Add a layer of crushed pretzels evenly over the caramel, then spread a thick layer of whipped cream on top. Repeat the layering process-caramel, pretzels, whipped cream-until all ingredients are used, finishing with the whipped cream layer on top.
Sprinkle flaky sea salt evenly over the final whipped cream layer to improve the salty-sweet flavor combination.
Cover the dish with plastic wrap and refrigerate for at least 4 hours, or overnight. This allows the layers to set and the pretzels to soften slightly while keeping their crunch.
Convenience - No baking needed, and it can be made in advance for stress-free serving.
Flavor balance - Sweet pineapple and creamy coconut blend with light vanilla notes from the wafers.
Texture - Crunchy wafers soften just enough while creamy layers hold their shape.
Appeal - Bright and visually inviting, making it a crowd-pleaser for any occasion.
Coconut whipped cream - Use regular whipped cream or a dairy-free alternative like almond-based whipped topping.
Pineapple chunks - Swap fresh pineapple for canned pineapple in juice to save prep time or use mango for a different tropical fruit twist.
Vanilla wafers - Substitute gluten-free vanilla cookies if needed to make the dessert gluten-free.
Sweetener in whipped cream - Replace powdered sugar with maple syrup or honey for a natural sweetener option.
2 cups coconut whipped cream chilled and fluffy
2 cups pineapple chunks fresh or canned in juice, drained
1 package (about 12 ounces) vanilla wafers
2 tablespoons powdered sugar optional, to sweeten the whipped cream further
1 teaspoon vanilla extract for the whipped cream
In a mixing bowl, gently fold the powdered sugar and vanilla extract into the chilled coconut whipped cream until evenly combined. Set aside.
In a serving dish or trifle bowl, start by spreading a thin layer of the whipped cream on the bottom. Arrange a layer of vanilla wafers evenly over the cream.
Spoon a layer of pineapple chunks over the wafers, followed by a generous layer of coconut whipped cream. Repeat these layers until ingredients are used, ending with whipped cream on top.
Cover the dish with plastic wrap and refrigerate for at least 4 hours, preferably overnight, to allow the layers to meld and the wafers to soften slightly.
Before serving, you can garnish with a few pineapple chunks or toasted coconut flakes if desired. Serve chilled and enjoy.
Convenience - Requires no baking and can be assembled in advance, saving time.
Flavor balance - Offers a balanced mix of spiced pumpkin and ginger notes.
Texture - Alternates between smooth cream and slightly softened, crunchy cookies.
Appeal - Ideal for fall celebrations and family-friendly occasions.
Gingersnap cookies - Use gluten-free gingersnaps to make the dessert gluten-free.
Pumpkin puree - Substitute canned pumpkin with homemade or fresh roasted pumpkin puree for a more natural taste.
Cream cheese - Replace with mascarpone or a vegan cream cheese to adjust richness and meet dietary restrictions.
Spices - Add nutmeg or allspice alongside cinnamon and ginger for varied warm spice notes.
1 (15-ounce) can pumpkin puree - Smooth pumpkin for the creamy filling.
1 cup heavy cream - Whipped to add lightness and volume.
8 ounces cream cheese, softened - Provides richness and tang to the filling.
¾ cup powdered sugar - Sweetens and balances the spices.
1 teaspoon ground cinnamon - Adds characteristic warmth.
½ teaspoon ground ginger - Brings a spicy, aromatic note.
¼ teaspoon ground nutmeg - Enhances the autumn flavor.
¼ teaspoon salt - Balances sweetness and spices.
1 (6-ounce) package gingersnap cookies - Adds crunch and complementary spice.
Optional: whipped cream and extra cinnamon for garnish
In a large mixing bowl, beat the softened cream cheese and powdered sugar together until smooth and creamy.
Add the pumpkin puree, cinnamon, ginger, nutmeg, and salt to the cream cheese mixture, blending thoroughly until the spices are evenly incorporated.
In a separate bowl, whip the heavy cream until stiff peaks form, then gently fold it into the pumpkin mixture to create a light, airy filling.
In a serving dish or trifle bowl, spread a thin layer of the pumpkin cream, then arrange a layer of gingersnap cookies over it. Repeat layering until all the cream and cookies are used, ending with a layer of pumpkin cream on top.
Cover and refrigerate the cake for at least 4 hours or overnight to allow the cookies to soften and the flavors to meld. Before serving, garnish with whipped cream and a sprinkle of cinnamon if desired.
Convenience - Requires minimal active time and makes a great make-ahead dessert.
Flavor balance - Combines nutty almond cream with tart, fresh raspberries for a refreshing contrast.
Texture - Softened shortbread layers paired with creamy filling create a tender, melt-in-your-mouth experience.
Appeal - Light and elegant, suitable for gatherings while being approachable enough for everyday enjoyment.
Shortbread cookies - Use gluten-free or almond flour-based cookies to make the dessert gluten-free.
Almond extract - Substitute with vanilla extract for a more neutral flavor.
Raspberries - Swap with strawberries, blueberries, or mixed berries depending on what's in season or preferred.
Heavy cream - Replace with coconut cream for a dairy-free alternative with a subtle coconut flavor.
1 ½ cups heavy cream - Chilled for whipping to create the creamy filling.
⅓ cup powdered sugar - Adds sweetness to the whipped cream.
½ teaspoon almond extract - Provides a distinct almond flavor.
1 package shortbread cookies (about 9 ounces) - For layering the cake.
2 cups fresh raspberries - Washed and patted dry, used between layers and for topping.
½ cup sliced almonds, toasted - Adds crunchy texture and almond aroma.
In a large bowl, beat the cold heavy cream with powdered sugar and almond extract until stiff peaks form. Set aside in the refrigerator.
Toast the sliced almonds in a dry skillet over medium heat, stirring often until lightly golden and fragrant. Remove from heat and let cool.
Line the bottom of a 9x9-inch pan or similar dish with a single layer of shortbread cookies, breaking some to fit as needed. Spread one-third of the whipped cream evenly over the cookies.
Sprinkle with a layer of fresh raspberries and some toasted almonds. Repeat layering two more times, finishing with whipped cream on top.
Cover the cake with plastic wrap and refrigerate for at least 6 hours or overnight. This allows the cookies to soften and flavors to meld. Before serving, garnish with extra raspberries and almonds if desired.
Convenience - Requires no baking and can be assembled quickly, making it easier to plan ahead.
Flavor balance - Combines the cool freshness of peppermint with rich chocolate layers for a refreshing yet indulgent taste.
Texture - Chocolate wafers soften in the refrigerator but still maintain a slight crunch, offering a pleasing contrast.
Make-ahead friendly - Can be prepared a day or two in advance, allowing flavors to meld seamlessly.
Use dairy-free cream - Substitute heavy cream with coconut cream for a lactose-free version with a subtle tropical note.
Gluten-free cookies - Replace chocolate wafers with gluten-free chocolate cookies to keep the dessert accessible to those with gluten sensitivities.
Peppermint extract alternative - If fresh mint is preferred, finely chop it and fold into the cream instead of using extract.
Add chocolate chips - Mix mini dark chocolate chips into the cream layers for extra texture and bursts of chocolate.
24 chocolate wafer cookies - Store-bought or homemade, for layering.
2 cups heavy cream - Cold, for whipping.
⅓ cup granulated sugar - To sweeten the whipped cream.
1 teaspoon peppermint extract - Provides the signature mint flavor.
2 tablespoons unsweetened cocoa powder - For a hint of chocolate in the cream.
¼ teaspoon salt - Balances sweetness and deepens flavor.
Chocolate shavings or crushed peppermint candies - Optional, for garnish.
In a large mixing bowl, combine cold heavy cream, granulated sugar, peppermint extract, cocoa powder, and salt. Whip with an electric mixer on medium-high speed until stiff peaks form.
Spread a thin layer of the peppermint chocolate cream evenly on the bottom of a 9x13 inch dish.
Arrange a single layer of chocolate wafer cookies over the cream, breaking cookies as needed to fit.
Spread another layer of the whipped cream mixture over the cookies, then repeat layering until all wafers and cream are used, finishing with a cream layer on top.
Cover the dish with plastic wrap and refrigerate for at least 4 hours, preferably overnight. This allows the wafers to soften and flavors to meld.
Before serving, garnish the top with chocolate shavings or crushed peppermint candies if desired. Slice and serve chilled.
Convenience - Requires no baking and can be prepared in advance.
Flavor balance - Combines creamy pudding with sweet bananas and subtly spiced vanilla wafers.
Texture - Soft pudding and bananas contrast perfectly with the crisp wafers that soften slightly over time.
Appeal - A crowd-pleaser that's family-friendly and works well for gatherings or casual desserts.
Use Greek yogurt mixed with a little honey instead of pudding for a tangy, lighter alternative.
Replace vanilla wafers with gluten-free cookies to accommodate gluten sensitivities.
Swap fresh bananas with sliced strawberries or peaches for a different fruit variation.
Use dairy-free pudding or coconut milk-based pudding to make it suitable for lactose intolerance.
3 cups vanilla pudding prepared or store-bought.
4 cups vanilla wafers about 120 grams.
3 large ripe bananas peeled and sliced.
1 ½ cups heavy cream chilled.
2 tablespoons powdered sugar for sweetening the whipped cream.
1 teaspoon vanilla extract to flavor the whipped cream.
In a large bowl, whip the heavy cream with powdered sugar and vanilla extract until stiff peaks form. Gently fold this whipped cream into the prepared vanilla pudding until combined.
In a serving dish or springform pan, spread a thin layer of the pudding mixture on the bottom. Add a layer of vanilla wafers, then arrange a layer of banana slices over the wafers.
Repeat layering by spreading more pudding mixture, followed by wafers and banana slices, until all ingredients are used. Finish with a layer of pudding mixture on top.
Cover the dish tightly with plastic wrap and refrigerate for at least 4 hours, ideally overnight. This allows the wafers to soften and the flavors to meld.
Before serving, optionally garnish with a few vanilla wafers or banana slices for presentation. Cut into squares and serve chilled.
Convenience - No baking required, just layer and chill for easy assembly.
Flavor balance - Sweet chocolate and marshmallow combined with the mild crunch of graham crackers.
Texture - Crisp crackers soften slightly under the creamy layers for a satisfying mouthfeel.
Appeal - A crowd-pleasing dessert that reminds you of campfire moments, perfect for both kids and adults.
Graham crackers - Use gluten-free graham crackers to make the dessert gluten-free.
Chocolate cream - Substitute with dairy-free chocolate pudding or mousse for a vegan-friendly version.
Marshmallow topping - Use vegan marshmallows or a marshmallow fluff alternative if you avoid gelatin.
Whipped cream - Replace heavy cream with coconut cream to keep the cake dairy-free and still creamy.
10 ounces graham crackers - Broken or whole, for layering and crunch.
2 cups heavy cream - For whipping into a light, fluffy chocolate cream.
8 ounces semi-sweet chocolate - Melted and cooled for mixing into the cream.
1 cup marshmallow fluff - For the topping to get that toasted marshmallow flavor.
2 tablespoons sugar - To sweeten the whipped cream.
1 teaspoon vanilla extract - To improve the flavor of the cream.
Optional: mini marshmallows or marshmallow cream topping - For additional toasting before serving.
In a medium bowl, whip the heavy cream with sugar and vanilla extract until soft peaks form. Slowly fold in the melted and cooled chocolate until fully combined and smooth.
In a 9x13-inch dish, spread a thin layer of the chocolate cream on the bottom. Layer graham crackers on top, breaking to fit as needed.
Spread a generous layer of chocolate cream over the graham crackers, then repeat layering graham crackers and chocolate cream until all ingredients are used, finishing with a layer of chocolate cream on top.
Spread marshmallow fluff evenly across the top layer. Use a kitchen torch to toast the marshmallow topping until golden brown and bubbly. If you don't have a torch, place the cake under a high broiler for 1-2 minutes, watching carefully.
Refrigerate the icebox cake for at least 4 hours or overnight to set and allow the graham crackers to soften slightly. Slice and serve chilled for the best texture and flavor.
Convenience - Requires no baking; just layer and chill.
Texture - Soft, moist cake layers meld with smooth, tangy cream cheese frosting.
Flavor balance - Rich cocoa notes with a subtle tang from cream cheese.
Family-friendly - Delicious for all ages and great for gatherings or casual desserts.
Red velvet cake - Use chocolate or devil's food cake for a slightly different flavor.
Cream cheese frosting - Substitute with mascarpone mixed with a little powdered sugar for a milder, creamier option.
Sugar - Use coconut sugar or a natural sweetener in the frosting for a refined sugar alternative.
Dairy-free - Swap cream cheese with a dairy-free cream cheese alternative for a vegan-friendly version.
2 cups red velvet cake, cut into 1-inch chunks or slices
1 cup cream cheese, softened
½ cup unsalted butter, softened
1 ½ cups powdered sugar, sifted
½ cup heavy cream, cold
Pinch of salt
In a large bowl, beat cream cheese and butter together until smooth and creamy. Add powdered sugar, vanilla extract, and salt, then continue beating until fully combined and fluffy.
In a separate bowl, whip the cold heavy cream to stiff peaks. Gently fold the whipped cream into the cream cheese mixture, keeping the texture light and airy.
In a medium dish or springform pan, spread a thin layer of the cream cheese frosting on the bottom. Arrange a layer of red velvet cake pieces evenly on top.
Spread a generous layer of frosting over the cake pieces, then repeat layering cake and frosting until all ingredients are used, finishing with a frosting layer on top.
Cover tightly and refrigerate for at least 4 hours, preferably overnight, to allow the cake to soften and flavors to blend. Slice and serve chilled.
Convenience - Requires no baking and minimal prep, perfect for busy schedules.
Flavor balance - Combines the sweetness and slight bitterness of Oreo cookies with smooth, creamy whipped topping.
Texture - The layering softens the cookies slightly while maintaining enough crunch and creaminess.
Appeal - A crowd-pleaser with a visually appealing layered look and familiar, beloved taste.
Whipped cream - Use coconut whipped cream or another non-dairy alternative to make it dairy-free.
Oreos - Substitute with gluten-free chocolate sandwich cookies if you need a gluten-free option.
Chocolate wafers - You can replace these with chocolate graham crackers or thin chocolate cookies to change up the texture slightly.
Sweetener - If you want to reduce sugar, use a lightly sweetened whipped topping or make your own with less sugar.
24 Oreo cookies - Crushed, divided for layering and topping.
2 cups heavy whipping cream - Chilled, for whipping until stiff peaks form.
¼ cup granulated sugar - To sweeten the whipped cream.
1 teaspoon vanilla extract - Adds flavor to the whipped cream.
20-24 chocolate wafer cookies - For layering in the cake.
In a large mixing bowl, beat the heavy whipping cream with sugar and vanilla extract until stiff peaks form, creating a fluffy whipped cream.
In a serving dish or rectangular pan, spread a thin layer of whipped cream on the bottom to prevent sticking.
Layer chocolate wafer cookies evenly over the cream, then spread a layer of whipped cream on top, followed by a sprinkle of crushed Oreos. Repeat the layers until ingredients are used, finishing with a layer of whipped cream and crushed Oreos on the top.
Cover the assembled cake with plastic wrap and refrigerate for at least 4 hours or overnight to allow the cookies to soften and flavors to meld.
Before serving, slice into squares and enjoy this creamy, crunchy, and sweet icebox cake chilled.
Convenience - No baking required, and you can prepare the cake in advance.
Flavor balance - The tart key lime pairs well with lightly sweetened cream.
Texture - Softened graham crackers layered with smooth cream create a pleasing mouthfeel.
Appeal - This dessert is bright, colorful, and suitable for gatherings or casual treat times.
Graham crackers - Use gluten-free graham crackers if you need a gluten-free option.
Sweetened condensed milk - Substitute with coconut condensed milk for a dairy-free alternative.
Heavy cream - Swap heavy cream for full-fat coconut cream to keep it dairy-free.
Key lime juice - Regular lime juice can replace key lime juice if it isn't available.
1 cup heavy cream - Cold, for whipping into a fluffy filling.
1 can (14 ounces) sweetened condensed milk - Adds sweetness and smooth texture.
½ cup fresh key lime juice - Gives the dessert its signature tart flavor.
1 teaspoon grated lime zest - Adds extra citrus aroma and flavor.
2 packages (about 14 ounces) graham crackers - Standard size, for layering.
Optional garnish: lime slices or extra lime zest - For decorative topping.
In a large mixing bowl, whip the cold heavy cream until stiff peaks form using an electric mixer.
Gently fold the sweetened condensed milk, key lime juice, and grated lime zest into the whipped cream until completely combined and smooth.
Spread a thin layer of the lime cream mixture evenly in the bottom of a rectangular or square dish.
Arrange a single layer of graham crackers over the cream, breaking them as needed to fit. Then spread another layer of the cream mixture over the crackers. Repeat the layering process until all ingredients are used, finishing with a cream layer on top.
Cover the dish tightly with plastic wrap and refrigerate for at least 4 hours, preferably overnight, to allow the graham crackers to soften and flavors to meld.
Before serving, garnish with lime slices or additional lime zest if desired. Slice into squares and serve chilled.
Convenience - No baking required, just layering and chilling for an easy make-ahead dessert.
Flavor balance - A nice mix of tangy cream cheese, sweet carrots, and cinnamon spice from the cookies.
Texture - Creamy layers contrast with crisp cookies softened by chilling.
Appeal - A crowd-pleasing dessert that looks elegant with minimal effort.
Dairy-free option - Use a plant-based cream cheese and coconut cream instead of regular cream cheese and heavy cream.
Gluten-free option - Substitute the cinnamon cookies with gluten-free cinnamon wafers or cookies.
Sweetener adjustment - Replace granulated sugar with maple syrup or honey for a more natural sweetness.
Flavor variation - Add crushed pineapple or raisins to the cream cheese mixture for extra fruity notes.
2 cups shredded carrots - Fresh, finely grated for mixing.
8 ounces cream cheese - Softened to room temperature for smooth blending.
1 cup heavy cream - Whipped until stiff peaks form.
½ cup granulated sugar - Adjust sweetness as needed.
1 teaspoon vanilla extract - Adds warmth and depth to the cream mixture.
½ teaspoon ground cinnamon - For subtle spice in the cream cheese layer.
20 to 24 cinnamon cookies - Use your favorite crunchy cinnamon-flavored cookies.
In a mixing bowl, beat the softened cream cheese with granulated sugar, vanilla extract, and ground cinnamon until smooth and creamy.
Gently fold in the shredded carrots to combine evenly throughout the cream cheese mixture.
In a separate bowl, whip the heavy cream to stiff peaks, then fold it carefully into the cream cheese and carrot mixture to keep it light and airy.
In a serving dish or individual glasses, layer cinnamon cookies evenly, then spread a generous layer of the cream cheese mixture on top. Repeat the layers, ending with cream cheese mixture on top.
Cover and refrigerate the assembled cake for at least 4 hours or overnight to allow the cookies to soften and flavors to meld. Serve chilled, slicing or scooping as desired.
Convenience - Requires no baking and can be prepared ahead, saving time and effort.
Flavor balance - Combines bittersweet chocolate wafers with lively cherry preserves and smooth whipped cream.
Texture - Layers soften in the fridge creating a tender, moist cake-like feel while still holding shape.
Appeal - Elegant yet approachable, perfect for family gatherings or casual entertaining.
Chocolate wafers - Use gluten-free chocolate cookies if you need a gluten-free option.
Cherry preserves - Substitute with raspberry or blackberry jam for a different fruit twist.
Whipped cream - Replace with coconut whipped cream for a dairy-free alternative.
Add-ins - Sprinkle toasted almonds or chocolate shavings between layers to add crunch.
Chocolate wafer cookies - 24 pieces, about 8 ounces, store-bought or homemade.
Cherry preserves - 1 cup, smooth or chunky based on preference.
Heavy whipping cream - 2 cups, chilled for whipping.
Powdered sugar - 2 tablespoons, to sweeten the whipped cream.
Vanilla extract - 1 teaspoon, for flavoring whipped cream.
In a large mixing bowl, whip the chilled heavy cream with powdered sugar and vanilla extract until stiff peaks form. Set aside.
Spread a thin layer of cherry preserves on the bottom of a 9x13-inch dish or similar sized container. Arrange a layer of chocolate wafers over the preserves.
Spread a generous layer of whipped cream over the wafers. Repeat layering with preserves, wafers, and whipped cream until ingredients are used, finishing with whipped cream on top.
Cover the dish tightly with plastic wrap and refrigerate for at least 4 hours or overnight to allow the wafers to soften and flavors to meld.
Before serving, garnish with additional cherry preserves or fresh cherries if desired. Slice and serve chilled.
Convenience - No baking required, simply assemble and chill.
Flavor balance - Sweet peaches paired with cinnamon-spiced cream create a cozy, fresh taste.
Texture - Crisp vanilla wafers soften slightly but hold some crunch, contrasting the tender peaches.
Appeal - Family-friendly and visually inviting, perfect for summer gatherings or casual weeknight desserts.
Vanilla wafers - Substitute with gluten-free vanilla cookies or graham crackers if you prefer.
Heavy cream - Use coconut cream to make a dairy-free, subtly tropical version.
Peaches - Replace fresh peaches with canned or frozen peaches when fresh ones aren't available.
Sweetener - Adjust honey to maple syrup or agave nectar for a vegan-friendly option.
4 cups fresh peaches peeled and thinly sliced
1 teaspoon ground cinnamon to add warm spice to the cream
¼ cup granulated sugar to sweeten the peaches slightly
2 cups heavy cream chilled for whipping
¼ cup honey for natural sweetness in the cream
1 teaspoon vanilla extract to flavor the whipped cream
40 vanilla wafers about 2 sleeves for layering
Toss the sliced peaches with sugar and cinnamon in a medium bowl. Set aside to let the flavors mingle while preparing the cream.
In a separate large bowl, whip the heavy cream until soft peaks form. Gradually add honey and vanilla extract, then continue whipping until stiff peaks develop.
In a 9x13 inch dish, spread a small layer of the whipped cream on the bottom. Arrange a single layer of vanilla wafers on top of the cream.
Spoon half the peaches evenly over the wafers. Spread about a third of the whipped cream over the peaches. Repeat the layers once and finish with a final layer of wafers topped with the remaining whipped cream.
Cover and refrigerate for at least 4 hours, preferably overnight, to allow the wafers to soften and the flavors to blend. Serve chilled and enjoy.
Convenience - No baking needed; just layer and chill for a few hours.
Flavor balance - Creamy coconut cream goes well with naturally sweet, tangy mango slices.
Texture - Crunchy vegan cookies soften slightly under the cream, giving a pleasant bite.
Appeal - Bright colors and tropical notes make it a crowd-pleaser at gatherings.
Coconut cream - Use store-bought or homemade, or substitute with cashew cream for a less coconut-forward flavor.
Mango - Try ripe peaches, pineapple, or papaya for a variation in tropical sweetness.
Vegan cookies - Replace with gluten-free cookies or graham crackers to adjust for dietary preferences.
Sweetener - If desired, add maple syrup or agave to the coconut cream for additional sweetness.
1 can (14 oz) full-fat coconut cream - chilled overnight to help it thicken.
2 cups ripe mango - peeled and sliced into thin pieces.
24 vegan cookies - such as vanilla or almond-flavored, store-bought or homemade.
1 tablespoon powdered sugar - optional, for lightly sweetening the coconut cream.
1 teaspoon pure vanilla extract - to improve the coconut cream flavor.
Scoop the thickened coconut cream from the chilled can, leaving any liquid behind. Whip the cream with powdered sugar and vanilla extract until smooth and fluffy.
In a rectangular or square dish, spread a thin layer of whipped coconut cream on the bottom. Arrange a layer of vegan cookies over the cream, fitting them snugly.
Add a layer of sliced mango over the cookies, then spread more coconut cream evenly on top. Repeat layering cookies, mango, and coconut cream until ingredients are used, finishing with a coconut cream layer.
Cover the dish with plastic wrap and refrigerate for at least 4 hours or overnight to allow the cookies to soften and flavors to meld.
Before serving, optionally garnish the top with a few extra mango slices or toasted coconut flakes. Slice and serve chilled.


:max_bytes(150000):strip_icc()/10813-best-chocolate-chip-cookies-mfs-146-4x3-b108aceffa6043a1ac81c3c5a9b034c8.jpg)